• Skip to primary navigation
  • Skip to main content
  • Skip to primary sidebar
The Happily Holistic Mom
  • About Me
  • Breakfast
  • Lunch
  • Dinner
  • Kid Food
  • Baking
  • Snacks
  • Soups
  • Gardening
  • Wellness
  • Links & Resources

Homeschool 101

September 29, 2023 by amlizza

Everything you need to make learning at home fun-whether you formally homeschool or not!

I am a first time homeschooling mom this year. A total newbie. For years, I knew in my gut that this is what would work best for my daughter. As her mom, I picked up on her personality traits and quickly realized that a traditional classroom setting was simply not for her. I started buying preschool homeschool curriculum when my daughter was 3. She is 5 now and I can confidently say that starting to lay that foundation at a young age is what has made this all possible. She has always been a fast learner and had a motivation to do schoolwork. I never have to force her since this has been our routine for as long as she can remember.

Below are two sets of curriculum that any family can use-even if you don’t plan on officially homeschooling.

The Peaceful Press

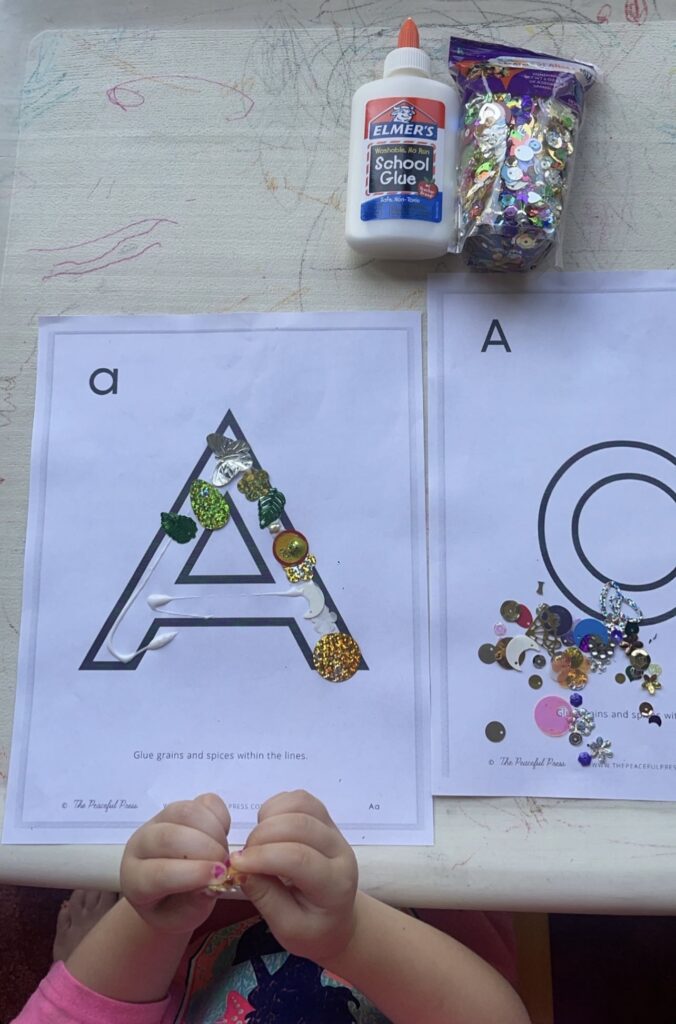
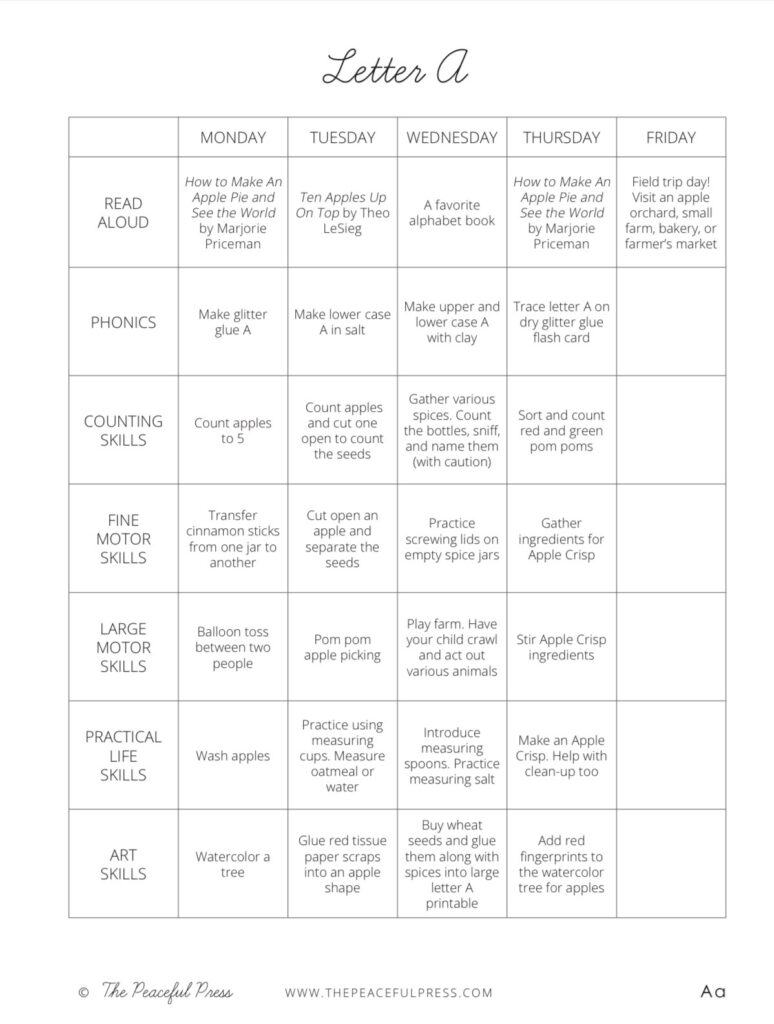
The first homeschool curriculum I ever got was from The Peaceful Press for under $50. It was such a nice introduction and laid the groundwork for where we are today. We absolutely loved this bundle. It is 109 pages including a book list with books for each letter of the alphabet, scriptures, recipes, and crafts for all the letters. It was extremely well put together for both parents and kids. When kids are that little they sometimes don’t have the fine motor skills to hold a pencil, so we did a lot of gluing things onto the letters and it really helped with letter recognition.

Home and Haven

Home and Haven has gorgeous seasonal curriculum and they run sales a few times a year. I snag them for $25 or 2 for $40. We absolutely love these bundles. They are extremely aesthetically pleasing and pretty to look at. These bundles are jam packed with fun printable pages, recipes, crafts, games, mazes word scrambles, word searches and coloring pages for each season. What I love about both The Peaceful Press and Home and Haven is that they’re digital downloads so I can print them over and over and over again as needed.

The best homeschool curriculum to begin with:

The Good & The Beautiful

I cannot say enough amazing things about this curriculum. I was a little overwhelmed and intimidated by the entire idea of officially teaching my daughter but everything we’ve used from The Good and The Beautiful has been so extremely easy to follow. My favorite thing about this curriculum is that it is faith-based so it teaches kids about God’s majesty and the nature He created. It is academically thorough and either meets or exceeds state and national standards. There are apps that have videos, books, audiobooks and games that go along with the lessons.
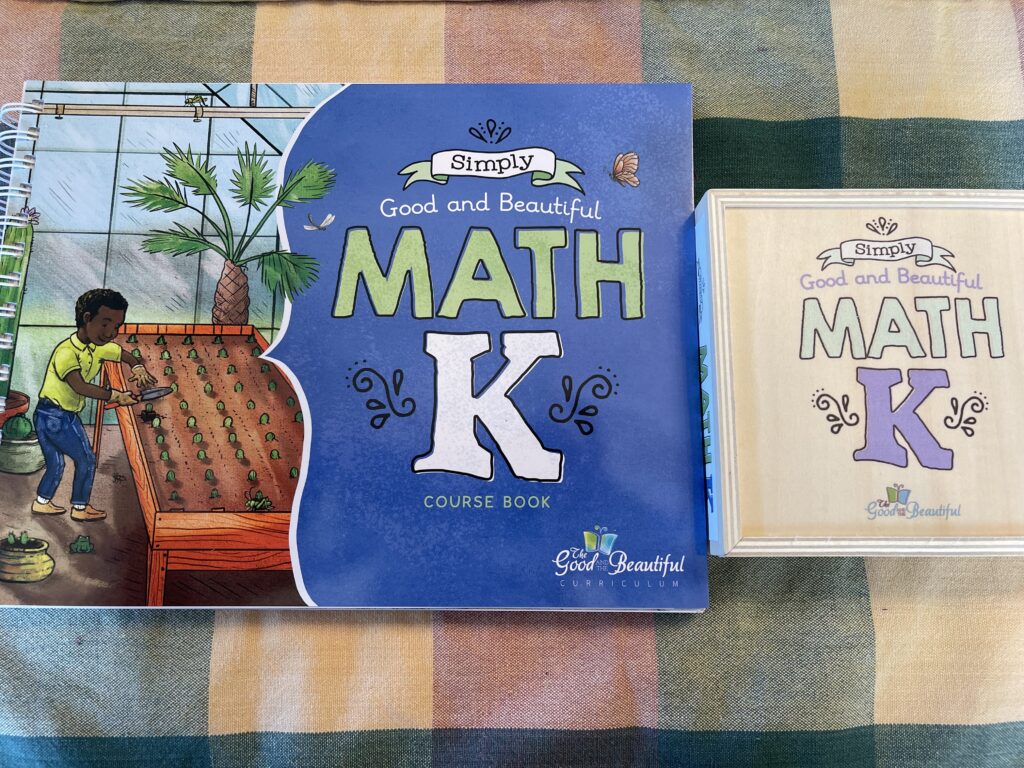
Math

Math is my daughters favorite subject now thanks to this book. She actually begs and bargains with me to do another lesson. We usually do two math lessons a day because she enjoys it that much.
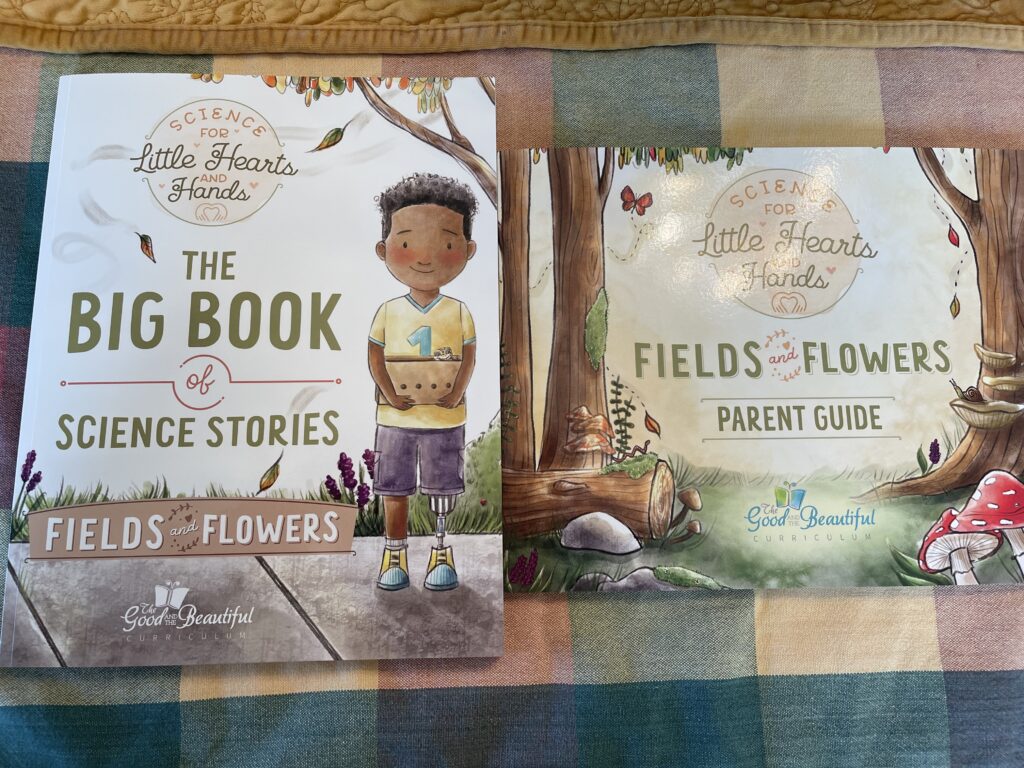
Science

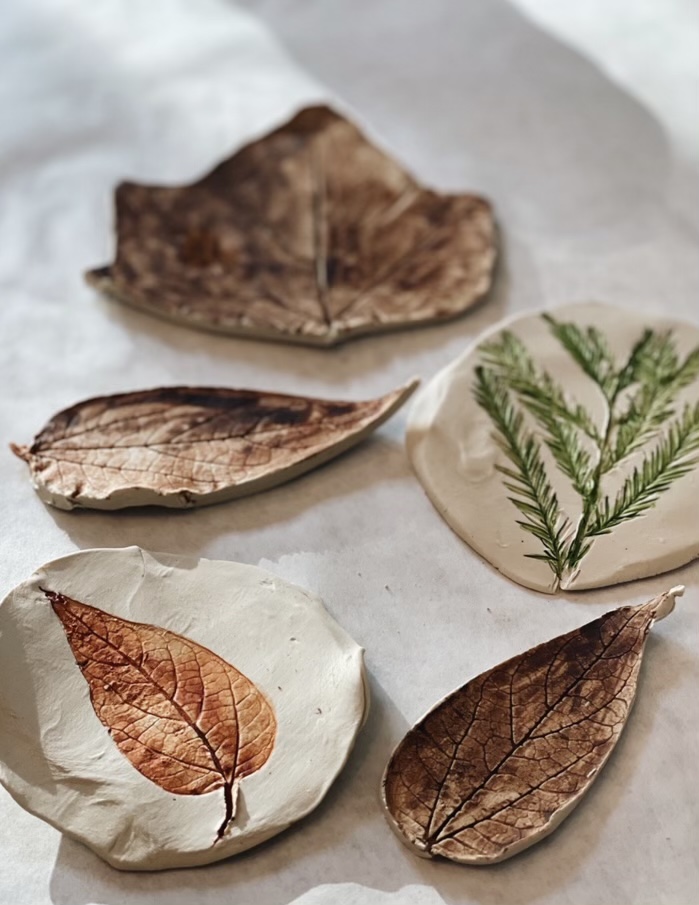
I feel so blessed to have this exact science course to teach because my daughter is completely obsessed with bugs, worms and all things nature. So far we’ve learned about deciduous trees, bark, where maple syrup comes from and mushroom and moss spores just to name a few.
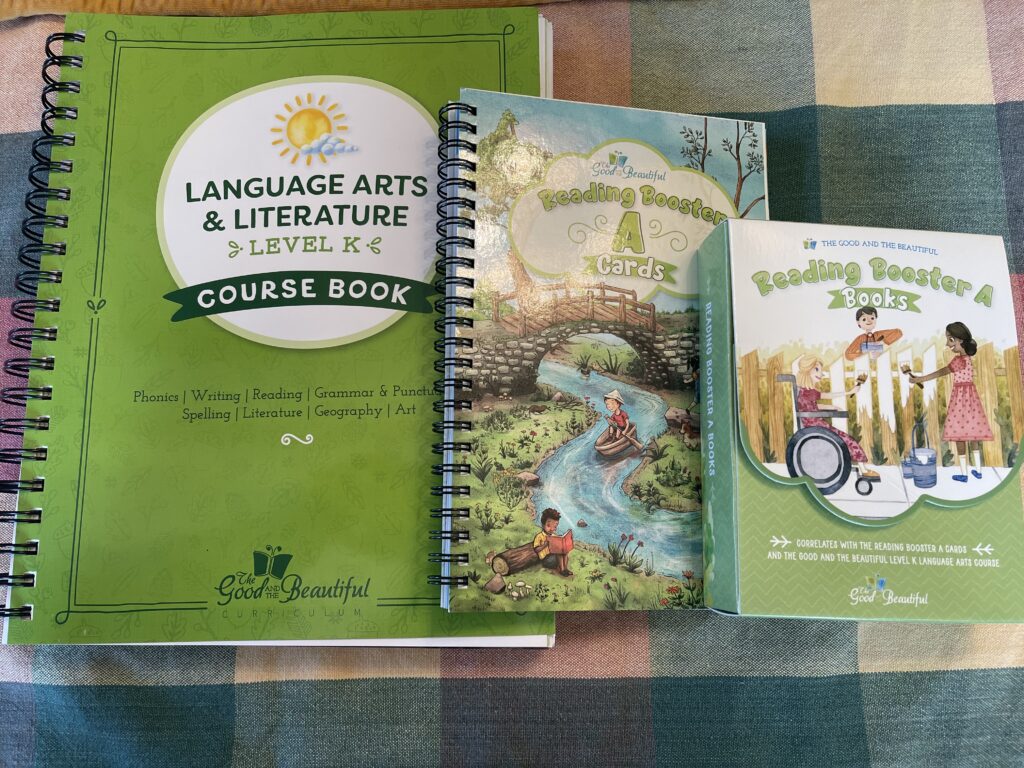
Language Arts

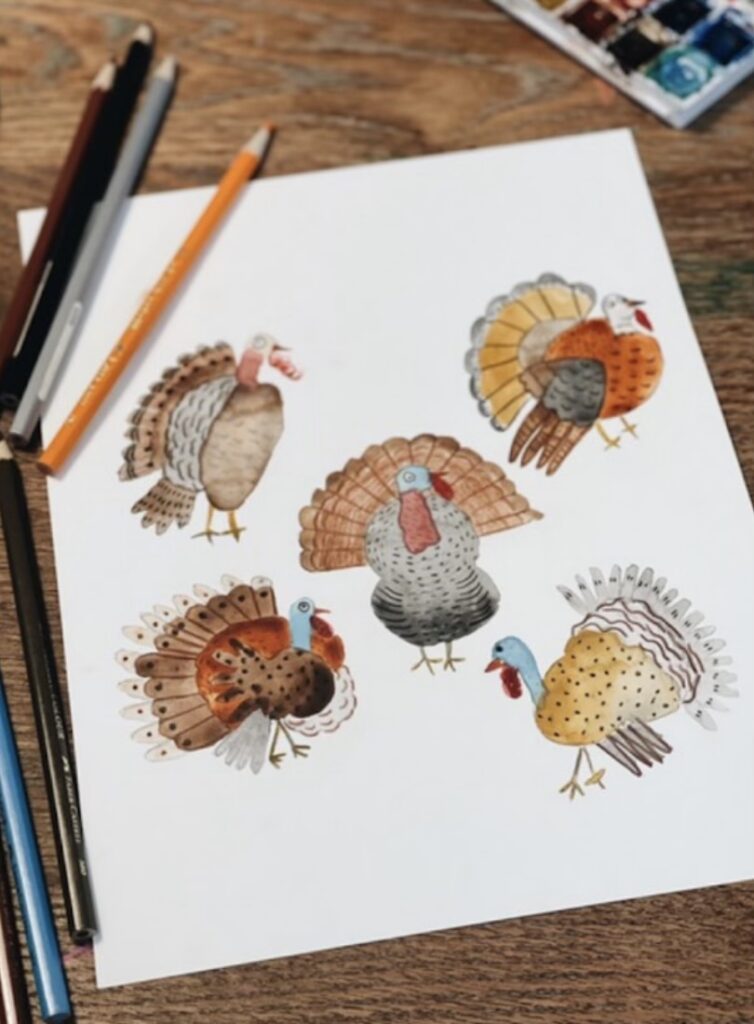
This subject comes with three items: a large workbook, a smaller book of reading cards, and box of 20 beginner books. Even the language arts is so spiritual, it will have the kids look at a beautiful illustration of a mountain side village and have the kids point out the things that God created.
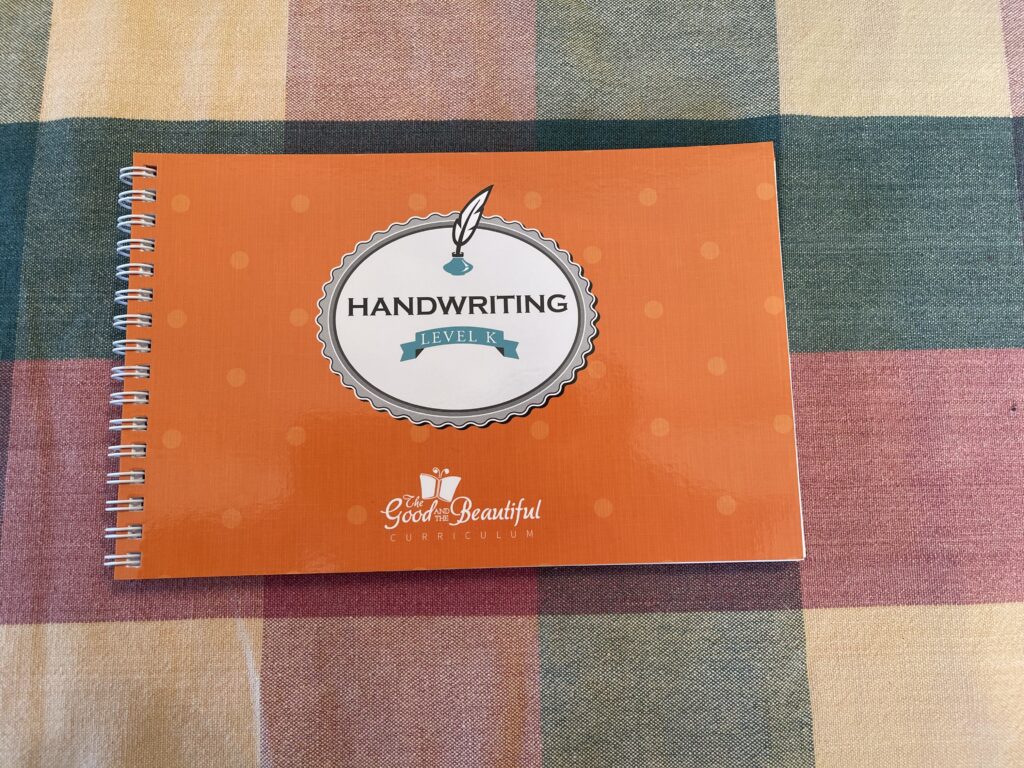
Handwriting

This is an optional bonus and not required but this is also one of my daughter’s favorite things to grab. She takes this to soccer games and even to Sam’s Club and works when she gets bored.

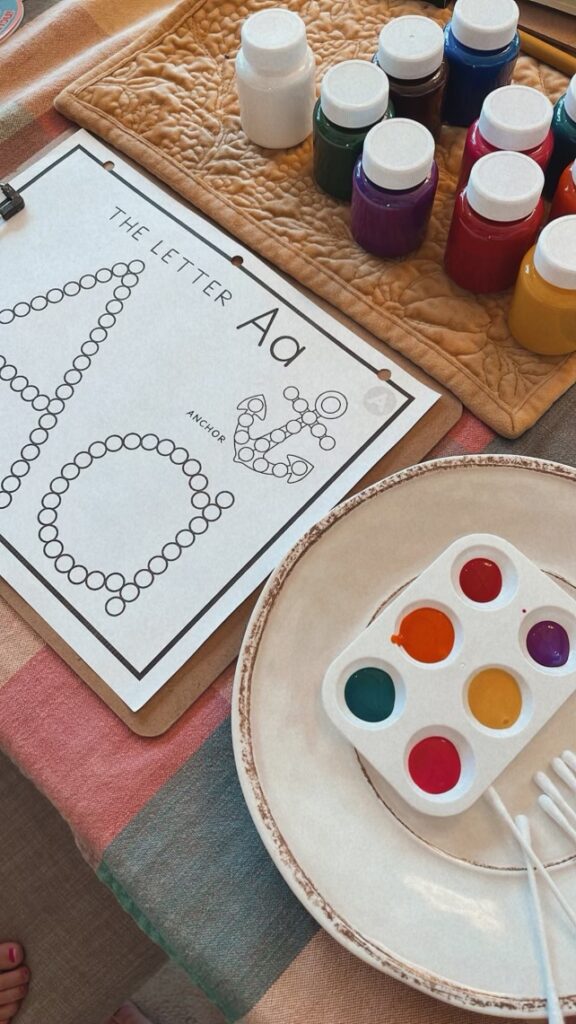
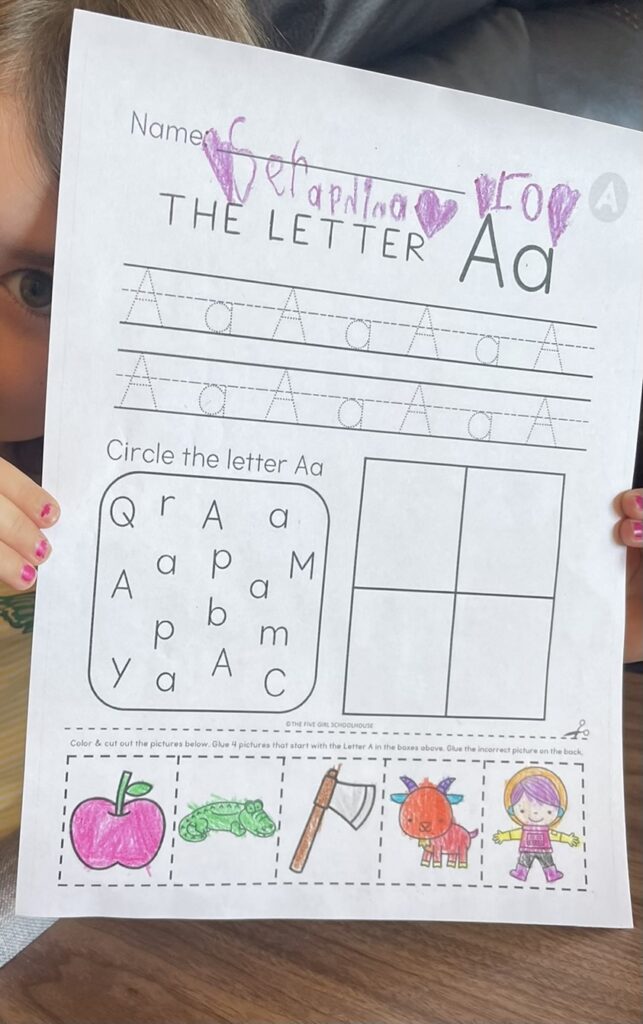
The Five Girl Schoolhouse

This is one of my favorite purchases I’ve made as far as learning goes. We use this as our Morning Warm Up. It is EXACTLY what the do in preschool and kindergarten. It is only $15 and you can print the pages over and over. I highly recommend this for any family-it helps the kids start to recognize their letters and it is a lovely screen-free way to keep them occupied.

A Day In The Life:

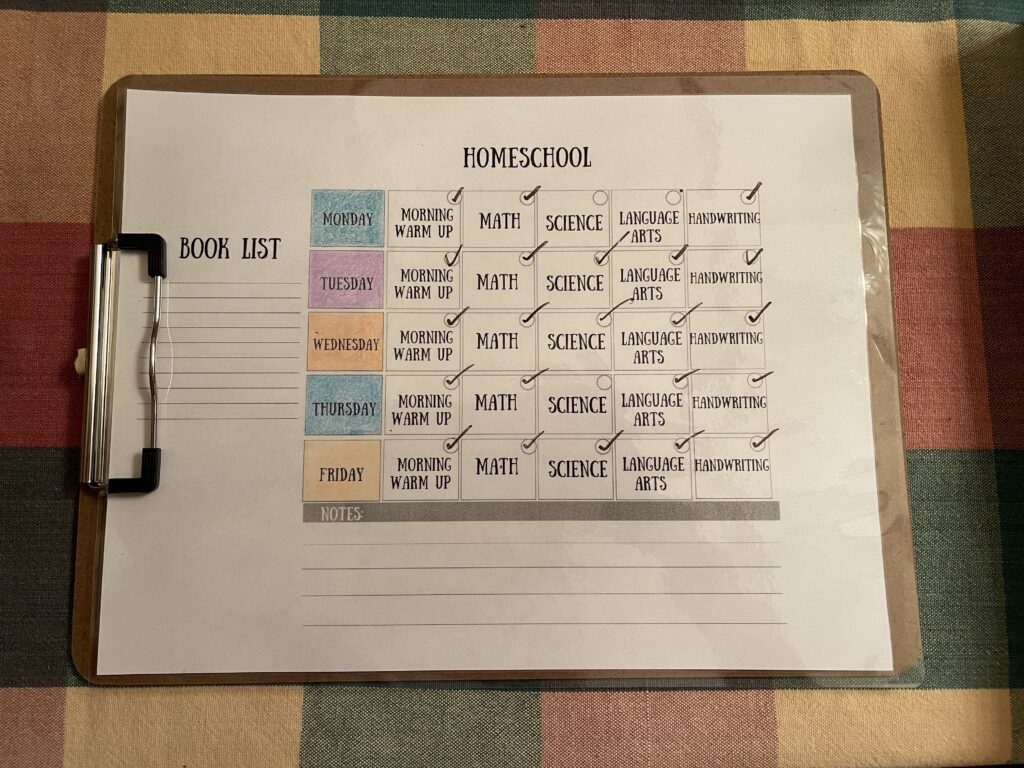
Here’s what a typical homeschool day looks like for us:

  • I wake up at around 6 to get my middle sons lunch packed and get him on the bus. I sometimes pack my daughter a lunch because she really liked that part of her school day so I want to keep that bit of normalcy for her. 
  • My daughter sleeps til around 8:30 am and is usually immediately hungry. She’s been known to eat her packed lunch for breakfast.
  • We start schoolwork around 9 with our Morning Warm Up and then we dive right into Math. Math usually takes us about 30 minutes and sometimes we do two lessons. 
  • We start Science class next. Science is pretty quick and usually consists of me reading a story and asking around three questions from the Parent Guide. There’s usually a video available pertaining to our lesson which is so helpful. 
  • Language Arts is a 3 part subject so we start off with Reading Cards for around 10 minutes then we do a lesson in the workbook. We then try reading one or two of the 20 books that come with the Language Arts course. This subject takes us around 40 minutes. 
  • Handwriting is last and we’re super casual about it so I let her do this with a snack to end our day. 
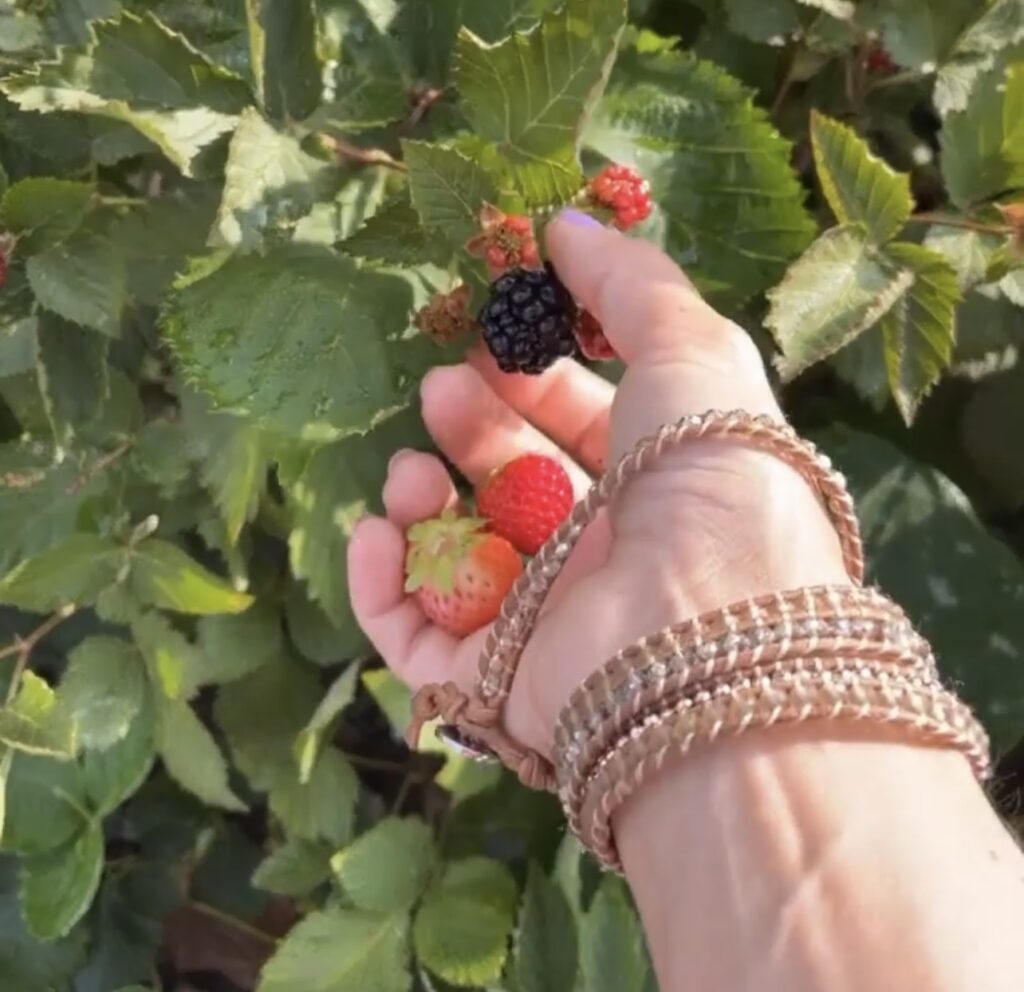
  • We go outside for “recess” if it’s nice enough. We like to take Nature Walks around our neighborhood for a scavenger hunt pertaining to what she’s learning in science class. We also love going on “Field Trips” to the Library and a Petting Zoo we have season passes to.

I hope this helps give you a starting off point if you’ve been wanting to get a head start on learning. Even if you never homeschool, all of these are amazing, affordable things you can introduce to kids as soon as possible. I always justify the price of these things by telling myself that I would most definitely spend $15 or $25 on my kids at any store. Happy Learning, Friends!

Filed Under: Homeschool

No-Fail Breakfast Casserole

July 26, 2023 by amlizza

You will make this crowd-pleasing breakfast again and again. It is so versatile and can be easily altered to your family’s preferences.

This recipe is a spin off of a Paula Deen breakfast casserole. The original is absolutely delicious and calls for maple sausage, making it the perfect blend of breakfast flavors. My family loves Western Omelettes so I wanted to use the same concept as the Paula Deen casserole but create something totally new. My family prefers the new and improved version to the original-hands down. These casseroles are so simple to make-I even make 2 at a time. They can be prepared the night before and simply popped in the oven when you wake up for an effortless morning. This is perfect for when you have company.

For years, I’ve made this in advance for our beach vacation and have frozen it so that all the hard work is done and out of the way. All I have to do is simply heat it up and enjoy my coffee as I watch the sunrise. This is the perfect recipe for feeding a crowd. Even if you only have a few to feed, any leftovers you have can be frozen. This casserole can be paired with some fresh fruit, cinnamon rolls, a side of bacon and some orange juice for a complete brunch!

What I like about this recipe is that most of the ingredients have a long shelf life so you can have the ingredients on hand and they won’t immediately go bad (with the exception of the bell peppers) if you need to wait a week to make this. I also love that you don’t have to make 2-3 different things in order to get everything all in one bite! You get your potatoes, breakfast ham (or sausage or bacon) and your eggs and cheese all on the same forkful.

What you’ll need for a breakfast casserole:

  • 13×9
  • A bag of shredded hash brown potatoes (I prefer the brand Simply Potatoes instead of frozen. They can usually be found by the dairy).
  • A breakfast meat-bacon, ground sausage or ham
  • Shredded cheese
  • Whole milk
  • 8 eggs
  • Dry mustard
  • Salt & pepper
  • Any additional ingredients you’d like to add-I added peppers and onions. You could add spinach, mushrooms, zucchini, tomatoes-anything you like.
Kristin Lizza

Western Omelette Breakfast Casserole

This will be your family’s new favorite breakfast. You can throw this together the night before and pop it in the oven in the morning.
Print Recipe Pin Recipe
Prep Time 20 minutes mins
Cook Time 40 minutes mins
Total Time 1 hour hr
Course: Breakfast
Ingredients Equipment Method

Ingredients
  

  • 1 Ham Steak cubed
  • 1 Yellow Bell Pepper
  • 1 Red Bell Pepper
  • 1 Large Onion
  • 20 oz Bag of Shredded Hash Brown Potatoes
  • 8 oz Shredded Cheddar Cheese
  • 8 Eggs
  • 2 Cups Whole Milk
  • 1 Tbsp Butter for cooking peppers and onions
  • 1 Tsp Dry Mustard
  • 1/2 Tsp Black Pepper
  • 1/4 Tsp Salt

Equipment

  • 13×9

Method
 

  1. Butter a 13×9 baking dish or use parchment paper.
  2. Preheat oven to 350.
  3. Dice bell peppers and onion.
  4. Melt 1 tablespoon of butter to a pan, salt the peppers and onions and cook until softened.
  5. Cube up the ham steak into tiny squares.
  6. Add the hash brown potatoes to the buttered 13×9.
  7. Layer the ham onto the potatoes then add the pepper and onions.
  8. Sprinkle the shredded cheese on top.
  9. In a large bowl, whisk together the milk, eggs, dry mustard, salt and pepper.
  10. Pour custard over the layers of potato, ham, peppers, onions and cheese.
  11. Bake at 350 for 35-40 minutes or until cooked in the middle.
  12. Remove from the oven and let it rest for 10 minutes before serving.
  13. Serve with bacon, fresh fruit, toast, juice and pastries for a complete brunch.

Filed Under: Breakfast

How To Grill The Perfect Steak

May 31, 2023 by amlizza

Go from zero to grilling hero with these tips and tricks.

In my family, I’m known as “The Grillmaster”. I’ve earned the nickname fair and square. Even when we go to my parents or my in laws-I’m on grill duty. I just can’t sit back and watch steaks get over-cooked and disrespected like that. It all starts with picking the perfect steak.

Our favorite cuts of beef:

We are Medium Rare Delmonico people. They’re also known as Ribeyes. We would choose this instead of Filet Mignon if I’m being honest. I have always found that more fat=more flavor and juiciness. Filet is an amazing gristle-free option but it’s one of the priciest cuts you can get. Obviously Filet is an amazing steak when you can splurge on it.

Rib Eye/DelMonico

Skirt Steak

A close second is Skirt Steak. If you can ever get your hands on Skirt Steak BUY IT! It is so flavorful and juicy. It’s called “a butchers cut” and is sometimes difficult to find because it is THAT delicious. I’ve seen it used as taco meat but we love it on its own with Garlic Potatoes. They are usually huge and can feed a crowd for under $20. Skirt Steak is best and most tender when cut against the grain like in this picture below.

Here are a few ways to make sure you knock your steaks right outta the park:

First and foremost: do not overcook your steak. If you find that its not done enough, you can always put it back on the grill, or put it in your oven at 350 for 5-7 minutes even (I’ve done both). Once you’ve overcooked your steak there’s nothing that can be done to reverse it so I like to err on the side of more rare than well done. I’ve found that letting the meat rest under foil is a really amazing way to ensure a juicy, perfectly cooked steak. 

Seasoning your steak to perfection:

Second: you need to season your steak. Less is more in this arena. I don’t use fancy marinades or spices. At the very least, salt and pepper but I highly recommend using FRESHLY GRATED garlic and olive oil in addition to salt and pepper. I simply cannot grill steaks without these three staples. Using a microplane for garlic is the easiest method I’ve found yet. I grate about 1 clove of garlic per steak and smear it on both sides of the steak as well as salt and pepper both sides. Next, you’re going to want to drizzle with olive oil. You don’t want to use a ton of olive oil on these (maybe 1-2 teaspoons per steak) because that will cause some major flames to flare up when you’re grilling. That’s IT! You’re ready to get grilling!

Fire up that grill!

You can either start your grill now or before you start to season your steaks. Let your grill get to about 450-500 degrees before putting the steaks on. The grill will naturally drop in temperature a little bit once you put the steaks on but this is right where you want it to be to get a good sear on your steak. For steaks that are about an inch thick, 3-5 minutes per side is really all you want them on the grill for. Again, if you decide its too under done, you still have the option of putting it back on the grill or in your oven at 350 degrees for 5 minutes or so. I have done both! I would rather do that than chew on shoe leather-just sayin. 

How to get the juiciest steak:

I always let my steaks rest on the platter covered in foil for about 10-15 minutes so it can continue to cook for a little bit and it also lets the juices redistribute so you get the juiciest steak possible. 

Some perfect pairings for your steak include:

Garlic Potatoes 

Caprese Salad

Grilled Onions

Roasted Brussel Sprouts

Greek Salad

Shrimp (Surf & Turf)

Corn on the cob 

Mac n Cheese 

Mashed Potatoes 

Roasted Hot Banana Peppers

Baked Potatoes 

Green Salad

Sautéed mushrooms 

Cucumber Tomato Salad

Caesar Salad

Creamed Spinach

Lemon Garlic Asparagus 

French Fries

Blue Cheese Steak Butter

Ways to use leftover steak (not that you’re going to have any!):

Steak and Eggs

Chinese Food

I hope you found this blog post to be helpful and informative! I love the way grilled foods in general taste but steaks are such a huge hit in my house! This was so much fun for me to write about and share with you guys so thank you so much for being here.

Filed Under: Dinner

Planting a vegetable garden for beginners

April 30, 2023 by amlizza

Here is your go-to guide for choosing some low maintenance, high yielding vegetables. 

As a gardener, there’s nothing better than snapping that first cucumber or tomato off the vine. This time of year, gardeners start to get that itch to map out what they’re planting and where. However if you’ve attempted gardening and failed, this time of year can feel bittersweet: you want to try again but part of you is convinced you’ll kill everything. Say no more, friend. I’ve been in your shoes. Don’t give up just yet. We’ve got this. Fresh herbs are almost a guaranteed success. Cucumbers, strawberries, lettuce, cherry tomatoes, squash and banana peppers have been high yielding and successful in our garden. I have made every mistake possible so I’m here to guide you to gardening success.

Seed starting vs buying started plants:

I know seed starting can be a fun hobby for some people but if you’re just starting out, I highly suggest finding a local nursery and buying started plants. It has saved me so much time and energy and really is a no-brainer especially if you’re a beginner. I’m not trying to deter you from starting your own seeds, but I’ve never really had too much success vs buying started plants. I personally found it to be an equally interesting and yet frustrating process but, to each their own! I have seen people be very successful planting their own seeds, but I personally like to conserve my energy in this area.

My favorite nursery:

My FAVORITE local nursery is Cellurale’s Garden Center. I frequent this nursery multiple times per planting season. They have an amazing variety, the best prices, but above all-the BEST CUSTOMER SERVICE EVER. My friend Elizabeth is beyond brilliant and helpful when it comes to all things plant related. I get all my fruit and veggie plants here but I also have been known to come home with 29 flower plants from here as well. My entire wildflower and vegetable garden is from Cellurale’s and it thrives every single year. This is not an ad: I truly love this nursery THAT MUCH! If you are local, I can’t recommend this place enough.

How do I choose what to plant?

My first suggestion is to plant what you and your family like to eat and plant what you buy regularly at the store. So if you go through a ton of strawberries like my family, that’s going to be a huge hit and save you some trips to the grocery store. It’s easy to get caught up buying cool plants, but if you plant a ton of kohlrabi when your family has never even heard of it, you’re probably setting yourself up for a tiny let down.

Strawberries

I suggest planting almost too many strawberry plants because sometimes it’s disappointing to only get 3 berries per harvest. Some get lost to pests like ants and slugs so I like to err on the side of excess berries.

Cucumbers

 Cucumbers are high yielding and taste so fresh and delicious straight from the garden. I make an amazing fermented pickle recipe HERE. Fresh cucumber slices in ice water is one of the most refreshing ways to use them also. A fresh cucumber, tomato salad with fresh herbs, balsamic and olive oil is such a nice summer side dish-no grocery store required. 

Tomatoes

I plant a wide variety of tomatoes. Some colorful, some big for sandwiches and some small for snacking. I like to use a fertilizer called Tomato Secret when I’m planting my tomatoes. I’ve always had success with them when I use this product. I have learned everything I know about tomatoes from Jessica Sowards at Roots & Refuge-specifically from this video on tomatoes and also this tomato tutorial-everything from how deep to plant them to how heavily to prune them. Jessica is a total gardening genius whom I still continue to learn from each gardening season.

Lettuce

We eat a TON of salad so I plant a lot of Romaine lettuce. Lettuce can be harvested many times by cutting the tops off horizontally and if the root is left intact, it will actually keep growing the whole summer. Arugula is a fancy addition to regular salads also.

Swiss Chard

Rainbow Swiss Chard became an instant favorite of ours too! None of us had ever tried it but ended up wanting to plant it every year now. It can be harvested all summer by cutting the tops off-just like lettuce. We eat it a few different ways but our favorite is simply with Extra Virgin Olive Oil and Salt.

Butternut Squash

Butternut squash takes up a bit of space but was an unexpected favorite of mine. The squash lasted into October or November and yielded a TON of large squash. I simply roasted most of these with garlic, olive oil, salt and pepper as a side but I also made quite a few batches of soup and even a sauce for Gnocchi and topped it with bacon, browned butter and garden sage.

Banana Peppers

We grow a lot of banana peppers. Some sweet for the kids but the majority is hot banana peppers and they are so delicious roasted with garlic and served with bread. My mom taught me to stuff hot banana peppers with Italian sausage, egg and bread crumbs and bake in tomato sauce. Jalapeño Peppers are another high yielding crop. Here is a Fermented Jalapeño recipe that is awesome paired with any meat like grilled chicken or steaks, or pork roast. These jalapeños are absolutely delicious on tacos and nachos as well.

Herbs:

I always purposely plant too much basil every year and it’s my most used herb. Every time I water my basil it makes my whole garden smell like heaven! Parsley is nice to grow for a green garnish but garlicky parsley red potatoes are a favorite way to use this herb. I grow chives for salads and baked potatoes, rosemary for any meats or breads and cilantro for salsas, guacamole and tacos.

If I notice that I’m not using my herbs fast enough, I will harvest them and dehydrate them and they last me all winter til I can plant fresh in the spring. 

Attract Pollinators with Sunflowers

Although sunflowers aren’t grown for eating, they serve a purpose other than being absolutely breathtaking! Sunflowers attract tons and tons of bees to your garden and help pollinate your plants. I plant a wide variety of sunflowers each year and they truly make my garden complete.

Some easy herbs to grow as a garden newbie: 

  • Basil
  • Chives
  • Parsley 
  • Rosemary 
  • Cilantro

Some low maintenance, high yielding plants for beginners:

  • Strawberries
  • Cucumbers
  • Cherry Tomatoes 
  • Lettuce
  • Banana peppers 
  • Jalapeño Peppers
  • Butternut squash 

For help getting started, check out my post on How To Build A Raised Garden Bed for a step by step guide including benefits of raised beds, materials needed to build, and mapping out the best location for your beds.

Filed Under: Gardening

How To Build A Raised Garden Bed

April 3, 2023 by amlizza

Here’s your step-by-step guide to building the worlds easiest raised garden beds using no tools.

Peppers, Tomatoes, Rainbow Swiss Chard, Watermelon, Cucumbers in a raised garden bed made from cedar boards.

Have you ever tried gardening in a raised bed?

If you’ve never had a raised garden bed before, you’re going to be pleasantly surprised with the results.
Let’s build a garden bed (or 3) together using zero tools! It’s way easier than you think! I would even dare to say that anyone can do it. I have tried many gardening methods including container gardening and in-ground gardening and have failed miserably. When I up-leveled my garden with these easy-to-build beds, my garden took off like never before.

Where I learned everything I know:

I learned this method and most of what I know about gardening from Jessica Sowards at Roots and Refuge. Here is the exact tutorial I used to make my first set of raised garden beds.

Some of the many benefits of raised garden beds: 

*Quality control of your soil, therefore less risk of diseases.  

*Less bending. 

*Less weeding. 

*Quickest solution to poor drainage. 

Raised Garden bed made from cedar boards growing trellised tomatoes and lettuce.

Why you want to use cedar boards:

You specifically want to use cedar for this project for a few reasons. One reason is that cedar naturally repels insects. Another reason is that cedar is rot resistant-meaning it’s not treated with a chemical lacquer that will leach into your beautiful soil/garden. Untreated lumber rots easily but cedar will last you YEARS even through the harshest of winters. 

Raised garden bed up close. Three cedar boards stacked to hold in soil.

Protecting your hard work with a wire fence:

If wildlife such as deer and rabbits are a factor, you’ll probably need a small fence around your garden which is relatively easy and quite worth putting up. You would not be happy if you woke up to find that your garden has been ravaged overnight. A few T posts, zip ties and wire fencing will keep them all away from your hard work. 

Bountiful garden with raised garden beds and wire fence around it.

Materials needed for one 4×8 foot bed:

Zero tools

6 cedar boards cut to 8 feet

6 cedar boards cut to 4 feet

8 corner blocks 

Landscape fabric 

*Optional but recommended: cardboard to lay down as a weed barrier under your soil.

I went to The Home Depot and found the cedar boards I wanted and I had an employee cut my boards to the length I needed. They will do this in most hardware store so I highly recommend taking this shortcut to make this project even easier!

You could easily modify this project to a smaller sized bed by making it 4×4 and cutting all your boards to 4 feet in length.

Three raised garden beds made from cedar boards and corner blocks filled with soil and plants.

Let’s build some garden beds:

Step 1: Map out your garden location 

Pick a level spot that gets at least 6-8 hours of full sun a day. 

Measure to be sure you have enough space. 4×8 feet is needed for each garden bed. Leave yourself enough room to walk around your beds so you can reach all your plants easily.

Make sure you pick a spot with access to water so you can water your garden.  

Step 2: This step is completely optional but I highly recommend removing the top layer of grass from where you’re putting your bed/beds only because you’ll have much less weeds as opposed to skipping this step. The easiest way to remove the grass is to spray paint around the patch of grass you’re removing and using a flat shovel, start going around the spray painted area. You’re going to basically shave the top right off until all you have left is dirt in the area you’ve selected for your garden. 

Step 3: Lay your landscape fabric down where you removed the grass if you chose to do so. You can secure the fabric using metal stakes designed for landscape fabric or even rocks or bricks. 

Step 4: Place your 8 foot boards and your 4 foot boards in rectangular shape. Place one corner block in each corner where your cedar boards meet and slide the boards down into the corner blocks so that they’re securely inside the notch in the blocks. Place your second corner block on the first block. Stack the boards 3 high on the 8 foot side and on the 4 foot side.

Step 5: When everything looks pretty even like a perfect rectangle, you can lay your cardboard down if you’re using any. 

Step 6: Fill your bed/beds with high quality topsoil-organic if possible. The most cost effective way to do this is to find a good local source and have a truckload of topsoil delivered to you. We lay a tarp down next to the garden and have the soil dumped on the tarp and then we fill the beds using a wheelbarrow. 

Step 7: You are ready to plant your veggies! 

Started plants from a nursery in a plastic flat container including Tomato plants, cucumber plants, romaine lettuce, pepper plants, basil, cilantro, rosemary, and parsley plants.

What can I grow in a raised bed?

You can grow an endless list of fruits and vegetables in these raised garden beds including:

*Tomatoes

*Cucumbers

*Peppers

*Squash, Zucchini

*Strawberries

*Blackberries

*Lettuce, Spinach, Arugula

*Fresh Herbs

*Potatoes

*Carrots

*Beets

*Beans

*Peas

Check out my post on what to plant in your new garden beds so you have the most success. I hope this post helped encourage and inform you on how simple it is to start growing your own food in a small space. Thank you so much for being here!

Filed Under: Gardening Tagged With: Gardening

Primary Sidebar

Recent Posts

  • Homeschool 101
  • No-Fail Breakfast Casserole
  • How To Grill The Perfect Steak
  • Planting a vegetable garden for beginners
  • How To Build A Raised Garden Bed

Recent Comments

  1. amlizza on How To Grill The Perfect Steak
  2. Renae Martinelli on How To Grill The Perfect Steak
  3. amlizza on Planting a vegetable garden for beginners
  4. JULIE BAKER on Planting a vegetable garden for beginners

Copyright © 2025 The Happily Holistic Mom on the Foodie Pro Theme